


CapCut - Video Editor
Bytedance Pte. Ltd.
When I first opened CapCut, I expected a quick editor for trimming clips and adding a soundtrack. It is certainly capable of that, but the app goes further by putting a surprisingly broad set of video-making tools into a phone-friendly workspace. It belongs to the video players and editors category, is free to install, and is made by Bytedance Pte. Ltd. My overall impression is that it is easiest to appreciate when you approach it with one small project in mind instead of trying to understand every button immediately.
The app is aimed at people who want to turn ordinary phone footage into something presentable without learning desktop editing software. That includes short social videos, travel recaps, birthday clips, product demonstrations, school projects, and simple talking-head edits. It is also useful when you need to make a video quickly and do not want to move files between a phone and a computer. At the same time, the large number of creative choices can make the opening screen feel busier than a basic editor.
Its public reception is mixed but substantial: it has a 3.5 average from around 13 million ratings, with roughly 120 thousand written reviews and over 1 billion installs. I would not treat that average as a complete verdict. The experience depends heavily on the kind of editing you do, the phone you use, and whether you prefer guided effects or a clean, manual timeline. For a first-time user, the important question is not whether it has enough tools; it clearly does. The question is whether you can find a comfortable workflow inside them.
Related News
CapCut Mastery: Unleash Hidden Features for Pro-Level Editing
How CapCut Turned Mobile Video Editing Into a Race for Attention

How MX Player Dominates the Video Playback Scene
Starting with a small project instead of the whole app
What the first screen is really offering
The safest way to begin is to choose a handful of clips that already belong together. A short sequence from a walk, a family gathering, or a day out is better than a large camera roll because it lets you judge the editor without spending time searching. Once your media is selected, the timeline becomes the center of the experience. You can see the order of the clips, move between them, and make changes without committing to a permanent version of the original files.
I recommend deciding on the purpose before touching effects. If the video is meant to show a place, the order of the shots matters more than decorative text. If it is a birthday message, clear speech and readable captions matter more than a dramatic transition. This simple decision prevents one of the most common beginner mistakes: adding visual treatment before the story is understandable.
Related News

Why WhatsApp Messenger Still Makes Everyday Communication Feel Easy

Jurassic World: The Game Is the Better Dino Tycoon for Strategic Players

Threads in Real Life: Who Should Join, Lurk, or Leave

How SHEIN Turned Shopping Into an Endless Content Feed

How to Make Fortnite Feel Smarter on Mobile

Should You Switch to Microsoft Outlook on Mobile?
The app’s store summary describes the basic idea as capturing a moment and cutting it, but my useful interpretation is more practical: it gives you a way to reduce a messy collection of phone clips into a sequence with a beginning, middle, and end. That is where the first meaningful improvement happens. A clean cut often makes a bigger difference than a filter.
Getting ready for the first edit
CapCut runs on devices using Android 6.0 or later, and the current version is 18.0.0. Before importing anything, I would make sure the phone has enough free space for the project and its exported copy. Video work can become inconvenient when storage is tight, especially if you are combining several long clips. I would also keep the original recordings untouched until the final result has been checked from beginning to end.
The app is free, which makes it easy to try without an upfront purchase. It also includes in-app purchases ranging from $0.49 to $669.99 per item. That wide range is worth keeping in mind when exploring optional creative material or advanced-looking tools. I suggest treating any purchase prompt as a choice rather than part of the basic learning path. You can learn the core editing rhythm first and decide later whether an extra feature is genuinely useful for your projects.
Gallery
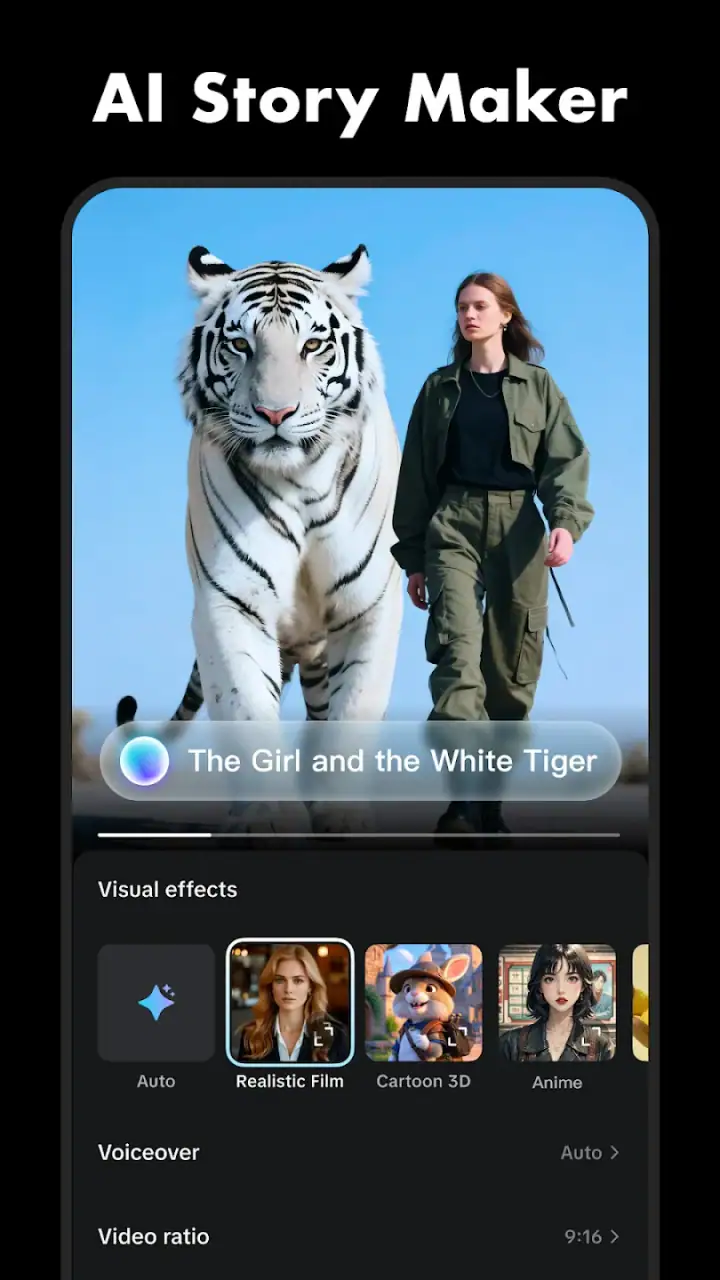
The content rating is Teen, so parents should consider that alongside the app’s creative and sharing-oriented nature. For a younger user, I would set expectations around which footage is imported, where finished videos are shared, and whether purchases are allowed. Those are sensible habits for any editing application, but they matter particularly when an app makes it easy to turn personal moments into polished clips.
The first successful action
For a reassuring first result, I would make a video of three clips. Put the establishing shot first, the most interesting moment second, and a closing shot last. Then trim the empty seconds at the start and end of each clip. This small exercise teaches the timeline, clip selection, and pacing without forcing you to learn every panel. When the result feels too slow, shorten the pauses before changing the style.
Next, add one simple title that explains the occasion or location. Keep it on screen long enough to read, but do not let it cover the subject’s face. I find that beginners often judge an edit by how many elements they added, while viewers usually notice whether the information is easy to follow. A single well-placed caption can be more effective than several animated labels.
If the footage contains speech, listen to the complete sequence before adding music. Background audio can make a montage feel finished, but it can also compete with a voice recording. Lowering the music or removing it entirely is sometimes the more professional choice. This is one of the app’s less obvious lessons: editing is often an exercise in subtraction.
After making those changes, watch the video once without pausing. Look for abrupt cuts, captions that appear too late, and moments where the image changes before the sound feels ready. Only then should you export a test copy. A short test saves time and gives you a chance to catch a mistake before creating the final file.
A practical phone workflow
Here is the workflow I would recommend for an everyday scenario. Imagine returning from a weekend walk with several landscape clips, a short clip of a friend speaking, and a few accidental recordings. I would first remove the accidental material from the project, place the wide view at the beginning, use the speaking clip as the human center, and finish with the most visually distinctive scene.
After that, I would trim every clip while watching for natural movement. A person beginning to turn toward the camera is usually a better cut point than an arbitrary middle frame. I would keep the music low under the speaking section, add one location caption, and use a restrained transition only where the change in scene feels abrupt. The finished video would probably be shorter than the original collection, but it would communicate the day more clearly.
This workflow also reveals an important trade-off. Automatic or decorative choices can make a first draft look lively very quickly, but manual trimming gives you more control over emphasis. I like using the fast options for inspiration, then returning to the timeline to correct timing. That combination is more reliable than accepting the first result unchanged.
Where beginners usually get confused
The biggest source of confusion is that an editing app can present many creative routes at once. A user may see templates, effects, text tools, audio controls, and timeline actions and assume that all of them are needed for a good video. They are not. For a first project, I would concentrate on importing, arranging, trimming, adding one piece of text, and reviewing the result.
Another common misunderstanding is the difference between changing a clip and changing the whole project. A filter or adjustment may affect the selected material, while a title or audio layer can behave differently depending on where it sits in the timeline. When something appears to change the wrong part, I would first check which clip or layer is selected rather than repeatedly undoing random actions.
Transitions deserve special caution. They are placed between clips, not inside a clip, so their effect depends on what is happening on both sides of the cut. A transition may look impressive in isolation but distract from a person’s movement or make a simple sequence feel slower. I use them as punctuation, not as a substitute for good clip order.
Text can also create avoidable problems. A caption that looks fine while editing may cover important details when the video is viewed on a smaller screen or in a different aspect ratio. I would keep wording short, place it away from faces and key objects, and preview it from the beginning. If a caption needs several lines, the underlying shot may need more screen time.
Choosing between quick results and precise control
CapCut is particularly appealing if you want a polished starting point without building every visual element from zero. Guided editing can help someone who has never worked with a timeline, and it can make a rough idea visible quickly. The drawback is that a guided result may feel familiar or overly decorated if you use it without personal adjustments.
Manual editing is slower, but it is where the application becomes more than a collection of ready-made looks. You can decide exactly when a reaction begins, how long a pause lasts, and whether a sound should continue across a cut. For a personal message or a small business demonstration, those decisions matter more than having the newest effect.
Compared with a very basic phone editor, this app offers a deeper creative range and more room to grow. A simple built-in gallery editor may be faster for rotating a clip or cutting off its first few seconds, and it may feel less crowded for one-off corrections. CapCut becomes the better choice when you want several clips, layered text, music, timing changes, and a repeatable editing routine.
Compared with desktop software, it is more convenient for quick work but less comfortable for long, complex projects. A large monitor, keyboard, and mouse still make detailed editing easier, especially when a project contains many layers or requires repeated precision adjustments. I would choose the mobile app for speed and accessibility, not because it removes every limitation of editing on a small screen.
Three habits that improve the result
- Build a silent rough cut first. Arrange and trim the visuals before choosing music. This keeps the story from being forced to match a song and makes it easier to notice weak footage.
- Use one visual idea at a time. If a clip already has movement, avoid covering it with heavy effects, busy text, and a strong transition. Leaving space in the edit often makes the important action clearer.
- Export a short test before the final version. Check the beginning, the middle, and the ending on the device where you expect to watch or share it. This catches timing and readability issues that are easy to miss inside the editor.
A fourth habit is to keep a clean master version. If you want a version with different text or music later, duplicate the project or preserve the unstyled sequence before making major changes. That is more useful than trying to reconstruct the original arrangement after several layers have been added.
Who will enjoy it, and who may want something else
I would recommend CapCut to a first-time creator who wants to make short, attractive videos from phone footage and is willing to spend a little time learning the timeline. It is a good fit for students preparing visual assignments, travelers making compact recaps, families assembling event clips, and creators who need to edit away from a computer. The free entry point also makes experimentation less intimidating.
I would be more cautious about recommending it to someone who only needs a one-step trim, because a simpler gallery tool may be quicker. I would also steer a professional editor toward desktop software when color control, extensive audio work, or a large multi-layer project is the priority. The app can be capable without being the most comfortable tool for every job.
People who dislike optional purchases or crowded creative interfaces should take a slow approach. The best experience comes from learning the basic editing path and ignoring anything that does not serve the current video. You do not need to explore every effect to make a strong result, and chasing every new visual option can make your work less consistent.
What I would do after the first project
Once the three-clip exercise feels comfortable, I would create a reusable personal routine. First, collect only the footage that supports the idea. Second, make a rough cut. Third, fix pacing. Fourth, add text or audio only where it improves understanding. Finally, review the complete video before exporting. Repeating that order reduces decision fatigue and helps you notice which parts of the process actually need more skill.
The next step could be a short voice-led video. Record or select a clear explanation, place supporting visuals around it, and use captions sparingly to reinforce key points. This teaches a more demanding form of editing because the images must support the spoken message instead of merely following attractive scenery. It is also a useful test of whether the app suits your real goals.
If your projects become longer, keep an eye on organization. Name or group ideas mentally before importing everything, and avoid treating the timeline as a storage bin for every possible shot. The more footage you add, the more valuable a clear selection process becomes. Good preparation is often what makes mobile editing feel fast.
In my experience, the strongest reason to try this app is the balance between immediate results and room to develop. You can begin with a simple cut, then gradually learn better pacing, cleaner captions, and more deliberate sound choices. The weakest part is the temptation to mistake a large menu of creative options for a finished idea. The tool helps most when you remain the editor rather than letting the effects make every decision.
For a free mobile editor with a Teen content rating and support for devices starting with Android 6.0, it offers a practical route from raw clips to a shareable video. I would install it for quick personal projects, short social edits, and learning the basics of a timeline. I would skip it for a tiny trim that a simpler tool can handle instantly or for demanding long-form work better suited to a computer. If you start with one small story and focus on clear cuts, the first useful result is much closer than the busy interface initially suggests.
FAQs for CapCut - Video Editor
What is CapCut and what are its main features?
CapCut is a versatile video editing app designed for both Android and iOS users. It offers a range of features including video trimming, cutting, and merging, along with advanced effects, filters, and transitions. Users can also add text, music, and stickers to enhance their videos. The app supports high-resolution exports, making it ideal for social media content creation.
Is CapCut free to use, and are there any in-app purchases?
CapCut is free to download and use, providing a comprehensive set of tools without requiring payment. However, it offers optional in-app purchases for additional features and effects. These purchases can enhance the editing experience, though the free version is robust enough for most users' needs.
Can CapCut be used by beginners, or is it more suited for experienced editors?
CapCut is designed to be user-friendly, making it accessible to beginners with its intuitive interface and easy-to-follow tutorials. At the same time, it offers advanced features that cater to experienced editors looking for more control and creativity. This dual approach makes it versatile for a wide range of users.
What video formats does CapCut support for editing and exporting?
CapCut supports various video formats, ensuring compatibility with most video files. Common formats like MP4, MOV, and AVI are supported for both importing and exporting. The app also allows high-resolution exports up to 4K, which is ideal for professional-grade video content.
Are there any privacy concerns when using CapCut?
CapCut requires standard permissions to access your device's media files for editing purposes. While it collects some user data, as with most apps, it’s important to review their privacy policy to understand how your data is used. Users are advised to stay informed and manage app permissions according to their comfort level.
Pros
- User-friendly interface for beginners.
- Extensive library of effects and filters.
- Supports high-quality video exports.
- No watermark on exported videos.
- Regular updates with new features.
Cons
- Limited advanced editing tools.
- In-app purchases for premium features.
- Occasional app crashes reported.
- Large file sizes for projects.
- Some features require internet access.


